
Your first soap recipe for beginners shouldn't be a circus act -- just a steady, four-oil bar that hardens up, lathers creamy, and doesn't pull a surprise meltdown at trace. If you want natural without the fussy extras, this is the clean, repeatable win your hands have been craving.
OSHA safety guidance classifies sodium hydroxide as a corrosive and stresses eye and skin protection; treat it like a power tool, not a pantry spice. That's the whole vibe here: measured by weight, mixed with respect, and handled with basic PPE so the process stays calm and predictable.
You'll get the exact recipe, the checkpoints that keep newbies out of trouble, and a simple path from raw oils to a cured bar you'll actually want to use.
Soap Craft Lab: Always add lye to water -- never water to lye.
Soapmaking 101: What You're Making and Why It Works
You're here for a creative outlet that's hands-on and chill, not a chemistry lecture. This intro makes the why click, so your first soap recipe for beginners feels less scary, more DIY, and honestly kind of rewarding -- especially once you see how natural ingredients turn into a real bar.
What Soap Is: Oils + Lye + Water
Soap is built from three basics: oils, lye, and water. That's it, and it's why a first soap recipe for beginners can stay simple and still work.
Core Parts and What Each One Does
- Oils / fats: the body of the bar; different blends change feel and foam.
- Lye (Sodium Hydroxide): the activator that kicks off saponification.
- Water: helps the lye mix evenly so the reaction can finish cleanly.
What You Get After Saponification
- Soap molecules that clean.
- Glycerin that's naturally made in the batch.
- A bar that settles during cure as excess water evaporates and pH balance calms down.
If your numbers are right, there's no bite-y leftover lye -- which is exactly what a safe, repeatable first soap recipe for beginners is aiming for.
Cold Process vs Hot Process vs Melt and Pour
Three routes, three vibes, and you'll see why beginner soapmakers keep circling back to the same starting point.
Cold Process
- You mix lye water into melted oils, blend to trace, then let time finish the job.
- Biggest win: it teaches you how saponification behaves, which makes every future first soap recipe for beginners easier to troubleshoot.
Hot Process
- Same core chemistry, but you cook it so it finishes faster.
- Great when you're impatient, but the texture can get rustic.
Melt and Pour
- You melt a premade base and customize it.
- Low stress, less control over ingredients, and not as helpful for learning formulation.
Quick Cheat Notes
- If you want full customizable control, pick Cold Process.
- If you want speed, pick Hot Process.
- If you want no-lye handling, Melt and Pour is the training wheels option.
For a steady start, Soap Craft Lab keeps most learners on a cold process first soap recipe for beginners, because it builds real skill without getting fancy.
Key Soap Properties Beginners Should Understand
Soap isn't good or bad by vibes; it's mostly math plus oil choice. A solid first soap recipe for beginners balances feel, cleaning power, and cure time.
What Changes What
- Hardness: how quickly the bar unmolds and how long it lasts.
- Lather: bubbles (big vs creamy).
- Cleansing: how strongly it lifts oils off skin.
- Conditioning: how not tight your skin feels after rinsing.
- pH balance: not neutral, but should land in a skin-okay range after cure.
Common Cause and Effect
- More coconut can boost cleansing and bubbles, but it can get harsh.
- More olive oil often improves mildness, but it can cure more slowly.
- Too much water can mean a soft bar that takes forever to firm up.
Property Focus Quick Reference
| Property Focus | What You'll Notice in the Shower | Typical Beginner Knob to Turn | Too Far Warning |
|---|---|---|---|
| Hardness | Bar unmolds cleanly, lasts longer | Add harder fats (butters) | Brittle, cracking |
| Lather | Foam level and creaminess | A little castor in the oils | Sticky feel |
| Cleansing | Squeaky vs comfy rinse | Reduce high-cleansing oils | Dry/tight skin |
| Conditioning | Softer after-feel | Increase olive-style oils | Slimy, slow cure |
| pH balance | Irritation risk | Correct lye discount + full cure | Zap/tingle = stop using |
Soap Craft Lab teaches these knobs with a repeatable first soap recipe for beginners, so you can change one thing at a time and actually know what happened.
A Beginner's Ingredient Philosophy
More oils don't mean better soap; it just means more ways to get confused. For a first soap recipe for beginners, boring is smart, and stable is a compliment.
Keep Your Starter Lineup Tight
- Olive for gentle conditioning.
- Coconut for lather and cleansing (not too much).
- Shea for a creamy feel.
- Castor as a small lather booster.
Plain-Language Rule Set
- Pick 3-4 natural ingredients you can buy again.
- Keep notes like a nerd, even if your vibe is stress relief.
- Repeat the same beginner soap recipe twice before tweaking it.
Tiny Checklist Before You Mix
- Fresh ingredients (old oils can smell off).
- Distilled water.
- Weigh everything; cups and guesses ruin a beginner soap recipe fast.
If you want a guided on-ramp, Soap Craft Lab keeps the first soap recipe for beginners approach simple: fewer variables, fewer surprises, better bars -- and you still get the fun creative outlet part.
Safety First: Lye Handling, Workspace Setup, and Emergency Prep
Before you try a first soap recipe for beginners, set up like you mean it. Lye isn't kinda spicy -- it's sodium hydroxide, and it demands grown-up rules. Soap Craft Lab keeps it simple: suit up, clear your space, and plan for accidents. This makes every first soap recipe for beginners calmer, cleaner, and way less stressful.
Lye Safety Rules You Must Follow
- Keep sodium hydroxide dry until mixing; dust in the air is trouble.
- No wandering off; never leave lye unattended, not even for a sec.
Splash and Fume Control
- Mixing rules: use a heat-safe container; lye solution gets hot fast. Stir slowly to avoid kick-up.
- Breathing rules: work with airflow; don't hover over the container.
Planning Habits
- Run your numbers in a lye calculator before you open the lye.
- Treat safety precautions like part of the recipe, not an extra.
Protective Clothing and PPE Checklist
Your first soap recipe for beginners goes smoother when your gear is already on.
- Safety goggles (real eye seal, not fashion glasses).
- Rubber gloves that cover wrists.
- Long sleeves, long pants, closed-toe shoes.
- Extra, but smart: tie back hair, ditch loose jewelry, and silence notifications so you don't get jumpy mid-pour. If you're using essential oils later, keep them capped until the lye is put away.
Ventilation and Work Area Setup
Airflow and Counter Layout
- Place your mixing spot near an open window.
- Add a fan that pushes air out, not at your face.
- Cover counters; lye spots can scar surfaces.
- Keep paper towels ready for oil drips, not lye spills.
- Arrange tools: lye container, water, spoon, thermometer, then oils like olive oil and coconut oil.
People and Pet Control
- Hard rule: kids and pets stay out until cleanup is done.
- Soft rule: tell everyone hot chemistry happening so nobody bumps you.
Making a Lye Solution Safely
For a first soap recipe for beginners, do it in this exact order:
- Measure distilled water into a heat-safe container.
- Slowly add sodium hydroxide to water (always in this direction).
- Stir until the liquid turns clear; keep your face back.
- Set it down somewhere stable to cool to your target temp.
- Only then prep oils (yes, even comfy ones like shea butter or castor oil).
Soap Craft Lab: Soap Craft Lab calls this the no-rush pour, because rushing is how splashes happen.
First Aid Kit Basics for Soapmakers
What to keep within arm's reach while making a first soap recipe for beginners:
- Running water access (sink clear, faucet easy).
- Sterile pads and clean towels.
- Burn gel (for heat, not for lye -- water is the move there).
- Emergency contacts where you can see them.
What to Do If Something Goes Wrong
- Skin: flush with cool running water for a long time. Remove contaminated clothing while rinsing.
- Eyes: rinse immediately and keep rinsing; get medical help.
Soap Craft Lab: Skip vinegar; Soap Craft Lab sticks to water-only rinse protocol for lye exposure.
Tools and Equipment You'll Use Every Time
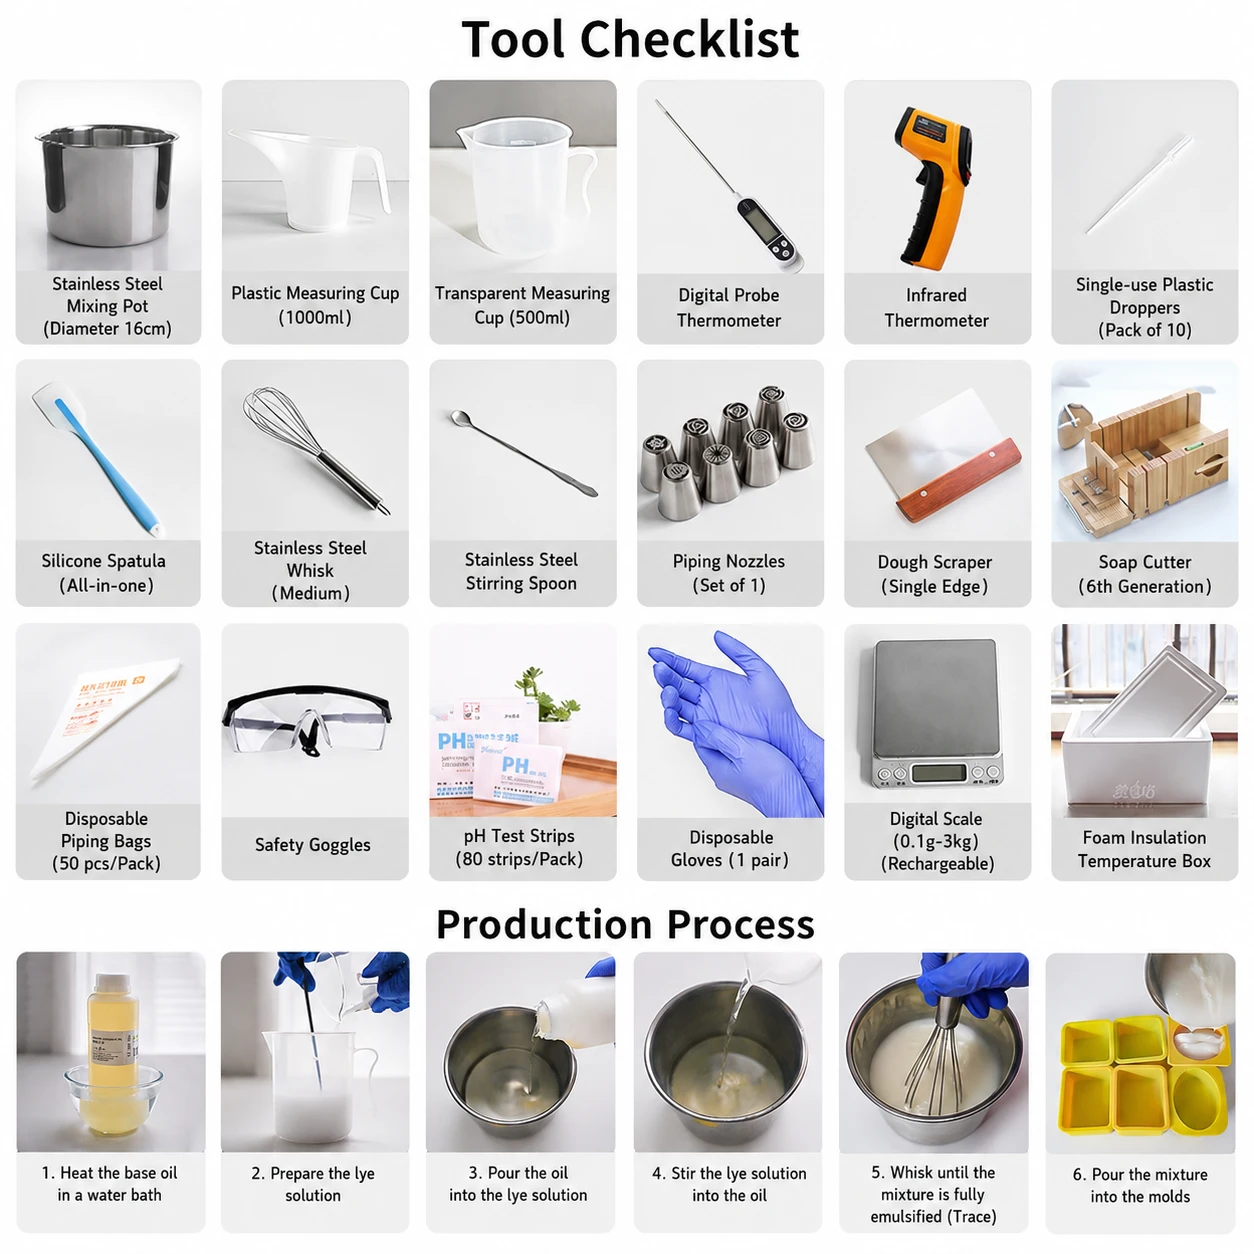
You can follow a first soap recipe for beginners and still end up with a mess if your setup is flimsy. This part keeps it simple: the tools you truly need, what to measure, when temps matter, and how to mold and cut cleanly. No fancy gear required for a first soap recipe for beginners.
Essential Soapmaking Tools (Beginner Minimum Set)
For a first soap recipe for beginners, a tight kit beats a cluttered counter. Keep these basics close, then stop shopping.
Measuring and Mixing
- Digital scale for every oil and lye number in your first soap recipe for beginners.
- Stirring rods and mixing spoons for scraping corners and keeping air out.
- Measuring cups only for liquids like water (not oils by volume).
Blending to Trace
- Immersion blender: short bursts, then stir; it keeps beginner soap recipe batter from splitting.
- Stainless steel pot: steady heat, easy cleanup.
Safety, Always
- Safety goggles and rubber gloves, even on a quick first soap recipe for beginners.
- A calm spot with ventilation and a protective covering so spills don't become drama.
Why Accurate Measuring Matters
Your first soap recipe for beginners is a tiny chemistry project, not a vibes-based snack. A few grams off can turn bars harsh, soft, or oily.
Quick Reality Check
- Digital scale beats spoons every time.
- Labeling supplies save you from guessing what's in that cup later.
Lye heavy feels stingy; too much oil can weep and separate. The fix is boring but effective -- measure, write it down, repeat the same numbers for every first soap recipe for beginners until your hands learn the routine.
Temperature Control: When to Use a Thermometer
Use a thermometer when your first soap recipe for beginners includes hard fats, or when the room is cold.
- Mix your lye solution, then park it somewhere safe to cool.
- Melt oils gently; don't scorch.
- Check temps for both -- close beats perfect, but don't mash hot lye into cool oils.
- If you see thickening that feels wrong, pause and re-check; false trace loves chilly fats like shea and coconut.
- Blend in short bursts until the trace looks real, not chunky.
Molds, Liners, and Cutting Tools
A clean mold setup makes a first soap recipe for beginners feel strangely easy.
Shaping, Cutting, and Keeping Order
- Soap molds should sit flat; wobble leads to lopsided bars.
- Liners help lift the loaf without prying or dents.
- Use a straight cutter, then move bars to organized shelves.
- Store extras in storage containers, and keep cleaning supplies handy for the sticky bits.
Mold Size Quick Reference
| Tool Choice | Typical Size (cm) | Target Bar Weight (g) | Unmold Wait (hours) |
|---|---|---|---|
| Loaf mold | 25 x 8 x 7 | 100-120 | 18-36 |
| Cavity mold | 7 x 5 x 3 | 80-110 | 12-24 |
| Silicone tray | 30 x 20 x 3 | 60-90 | 12-24 |
| Wooden loaf + liner | 30 x 9 x 8 | 110-140 | 24-48 |
| Log mold | 40 x 6 x 6 | 90-110 | 24-48 |
The Best First Soap Recipe for Beginners
If you want a first soap recipe for beginners that doesn't turn into a messy why is this separating day, keep it simple and stick to the basics. This first soap recipe for beginners uses a calm oil blend, correct distilled water and sodium hydroxide, and a clear plan from mix to mold. Soap Craft Lab teaches this beginner soap recipe the no-drama way.
Beginner Oil Blend: Olive, Coconut, Shea, Castor
This first soap recipe for beginners works because the oils aren't fighting each other.
Core Roles in the Oil Blend
- Olive oil: conditioning feel, slower to thicken, easier working time.
- Coconut oil: cleansing punch and quick bubbles, but can feel drying if overdone.
- Shea butter: adds hardness and a creamy lather, helping the bar feel finished sooner.
- Castor oil: stabilizes foam so bubbles don't vanish on contact.
How to Keep It Beginner-Friendly
Balance is the whole trick: cleansing from coconut oil, comfort from olive oil, structure from shea butter, and steady lather from castor oil.
Soap Craft Lab: If you're following Soap Craft Lab, don't freestyle percentages yet; nail the repeatable beginner soap recipe result first.
Distilled Water and Lye: What Correct Means
Correct in a first soap recipe for beginners is boring, on purpose.
- Use distilled water (not tap) so minerals don't mess with trace, color, or feel.
- Weigh sodium hydroxide on a digital scale; volume scoops are a fast track to a lye-heavy bar.
- Run every batch through a trusted soap calculator so your lye amount matches your exact oils.
- Mix safely: add lye into water, not the other way around -- splashes sting and can burn.
Quick Vibe Check
- Too much lye can cause zap and brittleness.
- Too much water can mean slow unmolding and a softer bar at first.
The best first soap recipe for beginners feels measured, not guessed.
Consumers continue to prioritize clean ingredients and ingredient transparency in personal care purchases, noted in NielsenIQ's 2024-2025 consumer trends coverage on beauty and personal care shopping behavior.
Step-by-Step Cold Process Instructions
This is the beginner soap recipe workflow that keeps your head clear and your batter calm.
Prep (Before Anything Gets Hot)
- Tools: immersion blender, scale, thermometer, spatula, mold, safety goggles, gloves.
- Space: ventilation, pets/kids out, sleeves down.
Make and Match
- Oils: melt hard fats, then combine with liquid oils; let the oil blend cool.
- Lye solution: mix sodium hydroxide into distilled water; cool it too.
Combine and Blend
- Pour lye solution into oils.
- Pulse the immersion blender in short bursts, then stir, until a light trace.
Pour and Rest
- Pour into the soap mold.
- Tap to release bubbles, then leave it alone -- no poking.
Soap Craft Lab: This first soap recipe for beginners rewards patience; rushing usually shows up as separation or weird texture later.
What Trace Looks Like (And What It Doesn't)
Real trace: the batter thickens a bit, and a drizzle leaves a faint line that sits for a moment, then melts back in.
False trace: it looks thick, but it's really cooled fats -- think shea butter starting to set -- so it can feel like pudding too soon.
Fix for false trace: warm the pot slightly, stir, and see if it turns smooth again; if it does, you weren't truly at trace yet.
Soap Craft Lab: For a first soap recipe for beginners, stop at light trace; heavy trace is where swirls get stubborn and pouring gets chunky.
Pouring, Insulating, and Early Gel Choices
Pouring is where a first soap recipe for beginners can still go sideways, so keep it steady.
Pouring Clean
- Aim the stream low and slow to avoid trapped air.
- Tap the mold on the counter a few times, like you're waking up bubbles.
Insulate or Not (Pick One on Purpose)
- Insulate lightly (towel/box): encourages gel phase for brighter color and a slightly harder early feel.
- Skip insulation: lowers overheating risk, handy if your room is warm or you used sugars/milks (not needed in this beginner soap recipe).
Early Handling Rules
- Keep the soap mold level and untouched for the first day.
- If the center looks like it's getting too hot (a raised volcano look), cool it down -- Soap Craft Lab calls this the save the loaf moment, and it's totally fixable.
Optional Additives and Scents
You can keep your first bars plain, yet a scent or soft color makes your first soap recipe for beginners feel like a real win. This part keeps it simple, so your first soap recipe for beginners doesn't turn into a science fair. Soap Craft Lab recommends choosing one add-on at a time, writing it down, then repeating it before you upgrade.
Essential Oils vs Fragrance Oils
For a first soap recipe for beginners, scents are the quickest way to overcomplicate a good batter, so pick one and stay calm. Soap Craft Lab suggests working with your digital scale and measuring cups like you're baking, because scent eyeballing is where trouble starts fast.
Essential Oils (EOs)
- Pros: simple ingredient list; familiar plant notes.
- Watch-outs: fading in cure; some can irritate at higher rates, so use protective gear and keep notes in your containers.
Fragrance Oils (FOs)
- Pros: stronger staying power; wider variety.
- Watch-outs: some accelerate trace, so your soap making tools need to be ready before you pour.
Beginner-Proof Path for Scent
- Use one scent only, at a conservative usage rate.
- Test in a small batch before scaling up your soap-making ingredients.
- Keep your base formula unchanged so you know what caused what.
Colorants: Mica Powder, Clays, and Natural Options
Color is fun, but in a first soap recipe for beginners it should behave, not fight you. Pre-mix mica or clay into a spoon of liquid oil in a small container, then blend in at a light trace so you don't get freckles or streaks.
Quick Picks
- Mica: bold color, easy dispersion.
- Clay: muted tones, extra slip, gentler feel.
Simple Dose Guide (Start Low, Adjust Later)
| Colorant Type | Starter Amount (per 500 g oils) | Pre-mix Oil (g) |
|---|---|---|
| Mica powder | 1.0 g | 10 g |
| Kaolin clay | 5.0 g | 15 g |
| Cocoa powder | 3.0 g | 15 g |
Soap Craft Lab: Use your digital scale for all of it; close enough makes patchy bars.
Exfoliants: When Less Is More
Exfoliants are where a first soap recipe for beginners can accidentally feel like sandpaper. Fine is friendly. Small is smart.
Try oats ground to powder, or a tiny pinch of poppy seeds, then live with one full bar in the shower before changing anything. Too much solid stuff can also weaken the structure, which shows up later as crumbling edges when you cut.
Additive Timing to Avoid Seizing and Separation
You're aiming for smooth batter, not a panic stir. Keep temperature control steady, and have your soap molds nearby so you're not sprinting across the kitchen with thick trace.
Timing That Usually Plays Nice
- At light trace: add pre-mixed colorant, then pulse briefly.
- Add scent last, stir by hand to avoid sudden thickening.
If the Batter Starts Acting Weird
- Seizing (thick lumps): stop stick blending. Hand-stir and pack into soap molds; it may still cure fine.
- Separation (oily layer): keep mixing gently to re-emulsify. Next batch, lower temps and simplify your additives with the same soap making tools.
Curing, Unmolding, Cutting, and Storage
You're close to the fun part of your first soap recipe for beginners: getting clean bars out of the mold, slicing them, then waiting long enough to make them actually nice to use. Soap Craft Lab keeps it simple, so your first soap recipe for beginners doesn't end in dents, crumble, or stingy lather.
Unmolding and Cutting Soap Without Damage
When your first soap recipe for beginners hits that firm but not rock-hard feel, unmold. Don't rush it.
- Soap molds matter here: silicone releases more easily; rigid molds may need a gentle freezer pop.
- Check the loaf's center: warm and bendy means wait.
- Check the edges: pulling away cleanly is a good sign.
Cutting Setup
- Tool choices: straight knife is slower but works; wire cutter is faster and tidier.
- Slice habits: mark widths for even drying; cut in one steady push, not a sawing fight.
- Corner care: support the bar with your palm to prevent cracks. If corners chip, cure longer and bevel later.
Soap Craft Lab: If you're using a first soap recipe for beginners, consistent thickness is the cheat code for consistent cure.
Curing Time: What Changes and Why It Matters
Cure is not just waiting around, even for a first soap recipe for beginners. You're watching water evaporation tighten the bar, while saponification completion finishes any last lagging reactions.
Quick reality check, in plain speak: softer bars melt faster in the shower. Harder bars last.
What Changes During Soap Curing
- Bar hardness rises as water leaves.
- Lather gets less slimy and more bubbly.
- Mildness improves as harsh feel settles down.
Short Notes That Save Frustration
- Heavy water discount? Easier unmold, shorter cure feel, but still give it time.
- High-olive recipes? Cure can feel slow; patience pays.
For many makers, a first soap recipe for beginners feels okay at 2-3 weeks, then noticeably better later with shelf life gains and steadier fragrance retention.
Storage for Best Hardness and Lather
Bad storage can wreck a first soap recipe for beginners after you did everything right. Humidity is the sneaky thief. Sunlight is the loud one.
Soap Storage Basics
- Airy shelf, not a sealed bin.
- Low humidity control (avoid bathrooms).
- Keep scent-heavy bars away from airflow that smells like cooking.
Packaging Choices After Cure
- Paper bands for breathability.
- Cardboard boxes with vents.
- Avoid tight plastic wrap too early; it traps moisture.
Storage Conditions Guide
| Storage Method | Relative Humidity (%) | Temp (C) | Expected Firmness After 4 Weeks |
|---|---|---|---|
| Open rack, dry room | 35-45 | 18-22 | High |
| Closet shelf, door closed | 45-55 | 18-24 | Medium |
| Bathroom cabinet | 60-75 | 20-26 | Low |
| Sunlit windowsill | 35-50 | 22-30 | Medium (scent fades faster) |
Labeling Helps You Track Progress
- Pour date, cut date, recipe name.
- Scent and color notes.
- Any additives (like oats).
Testing pH and First-Use Guidelines
For a first soap recipe for beginners, pH testing is a safety check, not a cure shortcut. Use pH strips or a pH meter, and keep lye safety as the rule, not a vibe.
Steps That Keep It Sane
- Make a 1% soap solution (a little soap in distilled water).
- Test, then wait a minute and re-check.
- Record results for your next batch.
What to Look For in Soap Testing
- High alkalinity can feel zappy or stingy.
- If you get skin irritation, stop using it.
- Extra cure time often helps, but don't power through discomfort.
Soap Craft Lab: Soap Craft Lab tip: treat every new bar like a patch test, even if it's your first soap recipe for beginners and it looks perfect.
Troubleshooting Beginner Soap Problems
If your first soap recipe for beginners goes weird, you're not cursed -- you just hit a common snag. This guide keeps it simple and real, with fixes you can try right away. Soap Craft Lab folks see these issues weekly, especially with a first soap recipe for beginners made on a cold counter.
False Trace: Causes and Prevention
When a first soap recipe for beginners thickens fast, it might be fake. Watch trace stages without panic.
- Cool temperature plus solid butters can make emulsification look finished when it's not.
- Warm oils and lye solution to a comfy range so the batter stays honest.
- Use the stick blender in short bursts, then switch to hand stirring.
- Check for stable emulsion: drizzle should sit briefly before sinking.
Soap Craft Lab: If you hit instant pudding, stop blending and let the heat do some work.
Oil Separation: Why It Happens
A split batch in a first soap recipe for beginners usually comes from a mismatch and haste.
Mixing Issues
- Not enough blending: return to the pot, re-warm, and blend to a real light trace.
- Over-blending: if you're already at thick trace, don't keep hammering it.
Additive and Rescue Options
- Fragrance or colorants can trigger separation -- test new scents in a tiny portion.
- Rebatching can save a soft, oily loaf: grate, heat low, splash of water, stir until it behaves.
Soda Ash: What It Is and How to Reduce It
On a first soap recipe for beginners, soap ash looks like dusty frosting. It's a surface reaction during curing, often from airflow and cool temps.
Prevention Knobs
- Cover the mold early.
- Reduce drafts and keep temperature steady.
- Spritz alcohol lightly if you want.
Soda Ash Factor Table
| Factor | Low | High |
|---|---|---|
| Airflow near mold (m/s) | 0.05 | 0.40 |
| Surface ash after 24h (0-10) | 2 | 8 |
| Room temp (C) | 20 | 26 |
| Alcohol spray (mL) | 0 | 6 |
Lye Heavy Soap: How to Identify and Respond
If your first soap recipe for beginners stings skin, treat it like a do not use moment.
- Stop testing on your hands; rinse with lots of water.
- Look for clues: harsh drag, crumbly edges, or pockets of liquid.
- If experienced, confirm with a careful zap check; if unsure, skip it.
- Options: rebatching with extra oils to buffer, or discard if you can't verify safety.
Crumbly Soap: Common Reasons and Adjustments
A first soap recipe for beginners can crumble when it's too dry or too hard too fast.
Common Causes and Quick Tweaks
- Common causes: low water, heavy hard fats, overheating.
- Quick tweaks: bump water slightly next time; weigh with a reliable scale.
- Ease up on brittle butters, and aim for medium trace before pouring.
- Cut sooner; waiting can turn bars into chalk.
Soap Craft Lab: If your loaf stays soft soap instead, don't force it -- Soap Craft Lab suggests waiting 24-48 hours, then decide between longer set time or rebatching.
Key Points Before Making Soap
- →Soap is made from just three things: oils, lye, and water -- no complex ingredient list needed.
- →The four-oil starter blend (olive, coconut, shea, castor) balances cleansing, conditioning, hardness, and lather.
- →Lye safety is non-negotiable: always add lye to water, wear full PPE, and work with ventilation.
- →Learn to recognize real trace vs false trace -- stopping at light trace keeps your batter workable.
- →Cure for 4-6 weeks minimum for a harder, milder bar with better lather and longer shelf life.